My experience on my daily works... helping others ease each other

Friday, June 21, 2024

FATHER OF ROBOTICS : ISMAIL AL-JAZARI

FATHER OF ROBOTICS: ISMAIL AL-JAZARI (1136–1206)


Ismail Al-Jazari was a polymath: a scholar, inventor, mechanical engineer, artisan, artist and mathematician from the Artuqid Dynasty of Jazira in Mesopotamia.'The Book of Knowledge of Ingenious Mechanical Devices' is a medieval Arabic book written by Ismail al-Jazari in the 12th century. 

It describes over fifty mechanical devices and automata, including clocks, water-raising machines, musical automatons, and humanoid robots. Al-Jazari provides detailed instructions for constructing each device and includes anecdotes and historical references. 

The book had a significant influence on the development of European clockmaking and automata, and it offers insights into daily life and technological innovations in the Islamic world during the medieval period. It's his book that influenced key concepts of modern-day robotics.

Copied...

The book is accessible at https://archive.org/details/cover_20200113_2057/mode/2up

Share:

Wednesday, November 8, 2023

🚨 A Wake-Up Call for Pattern Approval in the Age of Automation

Recent news on the unfortunate incident involving a South Korean man and an industrial robot serves as a stark reminder of the importance of stringent controls and assessments for robotics and AI systems. It's not the first case, and the implications are clear—it's high time we prioritize the thorough evaluation of algorithms and safety measures to prevent potential disasters. The last thing we need is our technological advancements turning into a real-life Terminator scenario or a page out of The Matrix.


💡 Ensuring Safety in the Age of AI


As we accelerate into an era dominated by automation, the necessity of validating artificial intelligence and robots before their integration into real-world scenarios becomes increasingly apparent. The risks associated with overlooking this crucial step are far-reaching, impacting not only individuals but also the trust we place in these transformative technologies. It's not just a matter of compliance; it's about safeguarding lives and instilling confidence in the capabilities of the AI and robotic systems we deploy.


🌐✨ Empowering a Secure Tomorrow with SIRIM's Assurance


In our dynamic world embracing the swift rise of automation, SIRIM, leveraging the expertise of NMIM, assumes a central role in sculpting a future where innovation harmonizes effortlessly with safety. As we lament recent unfortunate incidents, it is incumbent upon us to collectively advocate for responsible and secure technological advancements. SIRIM stands at the forefront, equipped to deliver crucial evaluations and verifications. Through SIRIM's pattern approval certifications, we meticulously inspect, test, and validate both hardware and software algorithms. Our commitment is to ensure that these technologies are not only cutting-edge but also safe, reliable, and robust, adhering strictly to the ethical standards of AI. Together, let's pave the way for a future where robots and AI enrich our lives without compromising on safety.


#ai #artificialintelligence #patternapproval #sirim #nmim #aimalaysia #sirimdigitalfactory #TechSafetyLeadership #InnovationWithIntegrity 🚀🔐


S. Korean man killed by robot

Share:

Monday, February 6, 2023

Open source GIS software

1. QGIS: https://lnkd.in/gbpdexdZ QGIS is a user-friendly Open Source Geographic Information System (GIS) licensed under the GNU General Public License. QGIS is an official project of the Open Source Geospatial Foundation (OSGeo). It runs on Linux, Unix, Mac OSX, Windows and Android and supports numerous vectors, raster, and database formats and functionalities.

2. GRASS GIS: https://lnkd.in/geXbgBBD GRASS GIS, is an Open Source Geographic Information System providing powerful raster, vector and geospatial processing capabilities. It can be used either as a stand-alone application or as backend for other software packages such as QGIS and R or in the cloud. It is distributed freely under the terms of the GNU General Public License (GPL). GRASS GIS is a founding member of the Open Source Geospatial Foundation (OSGeo).
 
3. OpenJUMP: http://www.openjump.org/ OpenJUMP is an open source Geographic Information System (GIS) written in the Java programming language. It is developed and maintained by a group of volunteers from around the globe. OpenJUMP started as JUMP GIS designed by Vivid Solutions.

4. uDig: https://lnkd.in/gGMF8rnC  he goal of uDig is to provide a complete Java solution for desktop GIS data access, editing, and viewing.

5. MapWindow GIS: https://www.mapwindow.org/ The MapWindow GIS project includes a free and open source desktop geographic information system (GIS) with an extensible plugin architecture, a GIS ActiveX control, and C# GIS programmer library called DotSpatial.

6. gvSIG: https://lnkd.in/gGYvfvHi gvSIG is a free and open-source GIS software that provides a range of functionalities for managing, analyzing and visualizing geographic data. It supports multiple file formats and provides advanced GIS analysis and visualization tools.

7. Geospatial Data Abstraction Library (GDAL): https://lnkd.in/gw_S-BZA GDAL is a free and open-source software library for reading, writing and transforming geospatial data. It supports a wide range of data formats and provides a comprehensive set of geospatial processing tools.

8. Geoserver: https://lnkd.in/gnPEmH8T Geoserver is a free and open-source software for publishing and managing geospatial data over the web. It supports a wide range of data formats and provides a user-friendly interface for managing and serving geographic data over the web.

Credit to Vikas Ghadamode
Share:

Friday, July 2, 2021

Windows 11 Insider - Taste of new Windows

I recently subscribed to be one of the Microsoft Insider Program to get the taste of new things from Microsoft. That happen after a friend of mine, whom are strongly supporter of OSS ad being promoting it share in his Facebook on the Windows 11 installation (of which he still unable to install it during this article is written here).
To those whom are interested to try, may browse it at Introducing Windows 11 | Windows Experience Blog

Rightly before you installed, you might wanna check you computer health by using the tools from Microsoft. Check it out here Check your device performance and health in Windows Security (microsoft.com)

It will indicate weather you are using a PC that could withstand the power of Windows 11 or not.

Next - subscribe for Microsoft Insider Program and do windows update where you have he ability to update to Windows 11 Insider (as I did). If you are in the Microsoft Insider Program, just open the windows update setting. It will indicate that you are ready for windows 11. Click install or update button to start the Windows 11 installation.

And here is my experience using it...

The installation is much faster compared to previous windows family. It took me about an hour to download it (with my Unifi running at 30Mbps shared with 5 kids for their home-schooling). And then it perform necessary setup. It will took about 10 minutes to complete install (on Corei7 10th Gen Lenovo Yoga with 512GB SSD and 16GB RAM).

Upon started, you will see Windows 11 page (or like mines - pinky screen) before the login screen / lock screen appear as below. Pretty nice on the design and the image change every time you lock or startup your machine


Now, you can use password, pin number and if your machine has biometric capability, than you can login using fingerprint or face. I think it start from Windows 10.

Upon login, you will realize that Windows 11 would like you think it as multi-platform OS; meaning you can use it on Laptop, PC, phone and tablet. It also try to imitate Mac OS icon display.

Here is my toolbar


Your icon may be different than mine, but probably, the first 4 from left shall be the same

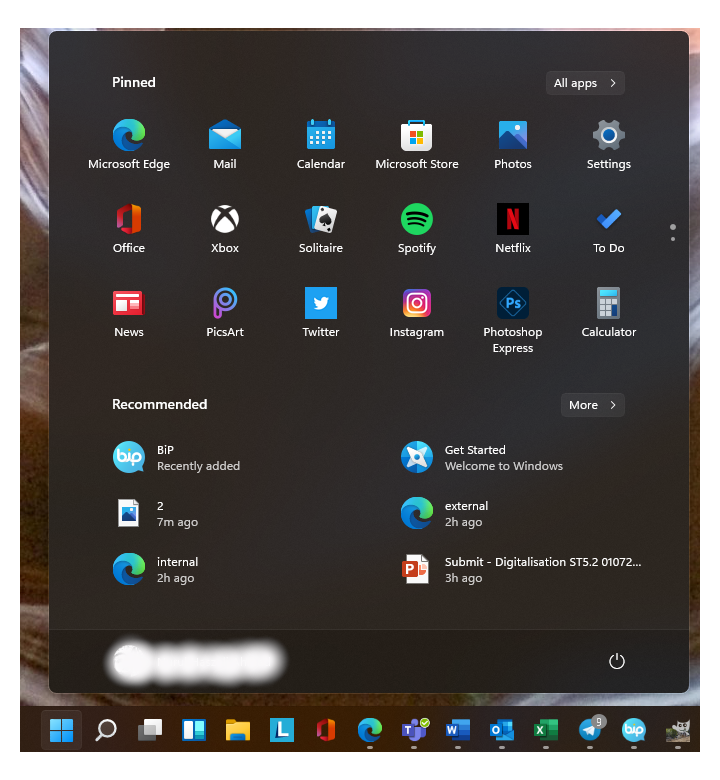
On click the first icon, window icon (I guessed), you will get to see the list of pre-install icon or apps that you already had. Kind of interesting, refreshing and modernize ways of browsing things. If you are familiar with Mac, this shall be your forte to search and find things

On search button, better than previous and clean interface

The third button is actually for you to have multiple windows which you can flip through. It is exactly similar to MacOS features. Once you add new desktop, it will behave exactly how you manage your Mac multiple desktop/screen. It is confusing at the beginning since the mouse pad on laptop was not design to behave like Mac OS handle multiple desktop.


The last new button on the toolbar is the widget button. Upon click on the button, you will get to see a list of widget appear on your left screen. I've yet to explore the widget, I think you can certain pre-defined widget


Finally, I would like to show the last changes (that I noticed since Window 10 and it was enhanced in Windows 11), the Setting button (previously we used to call Control Panel). Everything was done to harmonize the UIUX for windows on various platform. User will experience a seamless journey for using Windows on laptop, PC or mobile devices.


That's on the Look and Feel of which I rated 9/10. It was a significant improve from previous version, cleaner and refreshing modernize feeling. The only failure, from my perspective is the behavior which it tries to imitate Mac OS. It is almost there but not there yet. :)

By the way, no worries on other applications or tools installed earlier. Upgrading from Windows 10 to Windows 11 won't affect your software and you don't need to reinstall (not like previous OS, you may lost the registry and need to reinstall all software)

The Performance

Lets have a look on the performance of Windows 11. To ensure I'm not bias or wrongly judging it, here is the machine specs used
  • Lenovo Yoga S730 - SMIL Australian version (released in Australia)
  • Intel Core i7 10th Gen
  • 16GB RAM
  • 512 GB SSD
  • 2 Antivirus installed

Starting up / Reboot - Windows 10 is much more faster, but the difference is not that significant to me (approximately 3 seconds different)

Upon successfully login - Windows 10 is much more faster, but again, the differences is not that significant to user.

Using Edge - here where it start. Opening too many tabs on Edge in Windows 11 causing the memory to stood up eating about 50% of my memory. If you open other Microsoft software such as Teams and Outlook, you can feel that it has slowing down a bit. But for normal user, there won't be much difference that could cause you to lost patient. 


The vmmem previously was around 40%. However, in Windows 11, sometimes, it goes to more than 60%. Above is the image of my memory utilization. I have closed Teams and my edge only have 7 tabs. I do feel that Windows 11 yet to able to close properly any program and it takes time to close it.

Other Apps / software - Some of the apps, for instance GIMP (I'm using it for image processing), social media desktop apps, and even office are quite slow to open on the first time you trigger it. However, the time difference compared to Windows 10 is not that relevant for you to switch back.

Will I promote Windows 11?

My verdict, Go for it when it is officially release. Why? Despite the lagging (which not that significant), you will get an OS that is close to Mac (to Mac user), friendly to Linux and a clean windows interface which will improve your user experience, hence do the work better. I bet that they will improve for official release.

NOTE: Please make sure you are using SSD and at least 16GB RAM. Else, I would not suggest it. 

Ok. Have fun trying it. Adois


Haszeli :)


Share:

Saturday, June 13, 2020

Caching an Inverse of a Matrix Using R


Caching an Inverse of a Matrix Using R 

Matrix inversion is usually a costly computation and there may be some benefit to caching the inverse of a matrix rather than computing it repeatedly.

This is an example code to cache an inverse of a matrix which then called if:

1. The new matrix computation similar to the previous matrix
2. Matrix is invertible — Read Invertible Matrix
3. The structure and content of the new matrix is equal to previous

The program consists of two functions

  1. A function to cache the matrix and the inverse. It is similar to getter and setter in many programming languages like Java and C.
  2. A function which will be call for the computational process of the matrix

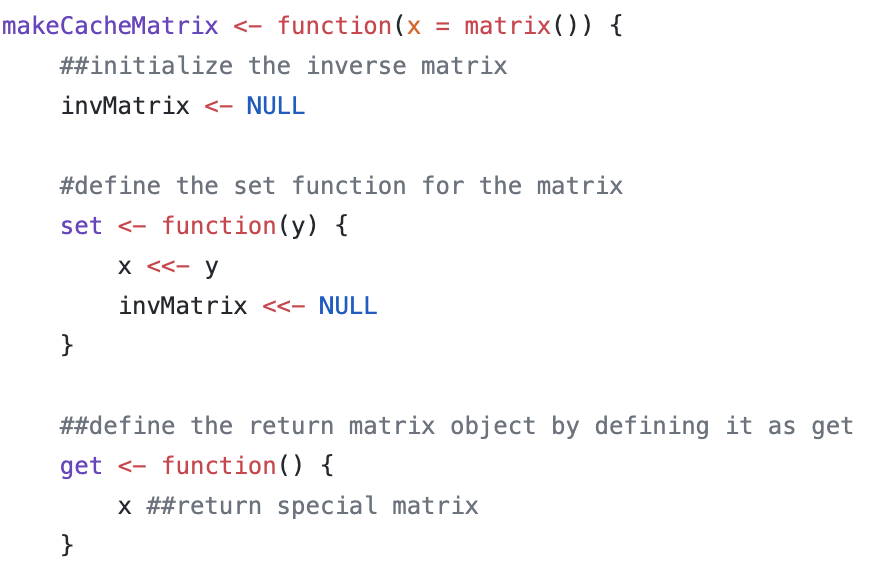
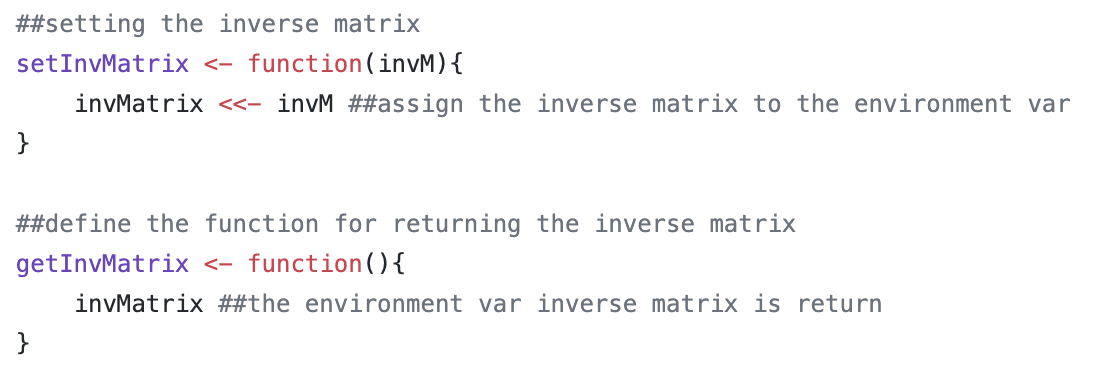
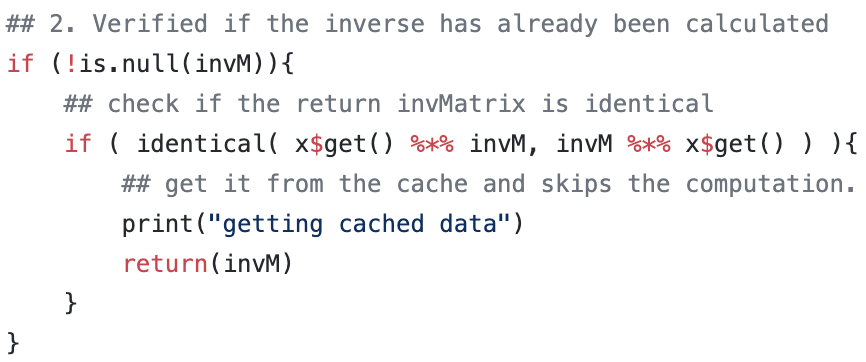
Here are parts of the code:

Setting the matrix
Setting the inverse matrix
Verification on the matrix
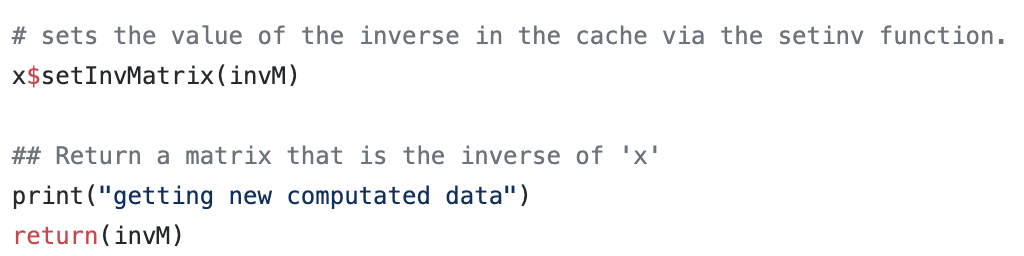
Setting the new inverse

Complete source code is reachable at https://github.com/masteramuk/ProgrammingAssignment2

If you like the post, do buy me a coffee please :)

Buy Me A Coffee
Share:

Monday, June 1, 2020

Reading entire URL content is really easy using R

In my good old days, reading the entire content of a website is not easy. The process of web scraping and getting the required data requires lots of programming and a few tools. A friend of mine even developed and sold the tool which he called it (during the development) as myrobot. He developed using PHP.

Now, it is much easier and one of the many ways is using R.

Here are the steps (which requires you to write ONLY two lines of code)

  1. Connect to the website using URL command
    con <- url ([the website url], “r”)
  2. Then, read the website
    x <- readLines(con)
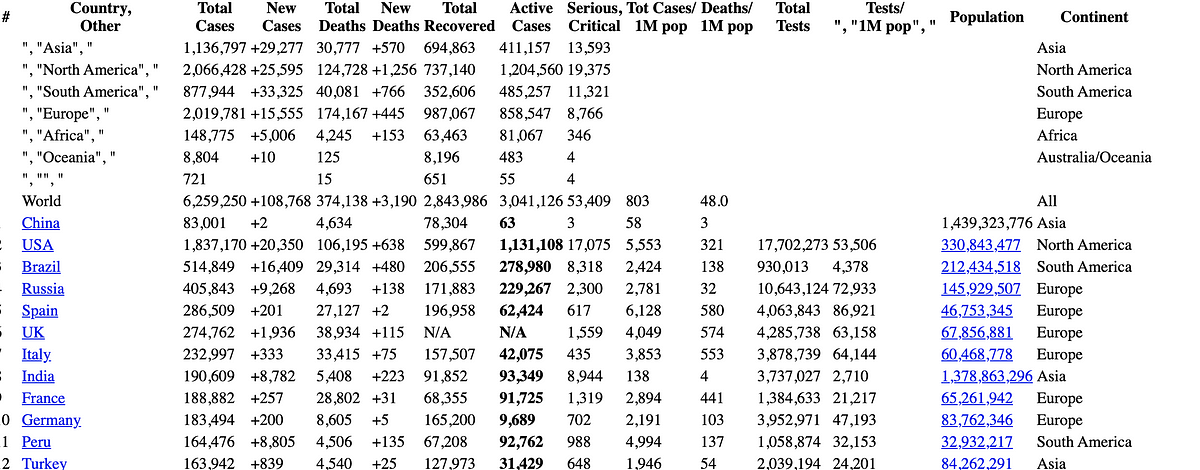
  3. Do whatever you wish with the data. In this example, I print out the head of the website and also copy the whole content to a file.
    head(x)
    dput(x, “readFromUrlExample.html”)

There you go.

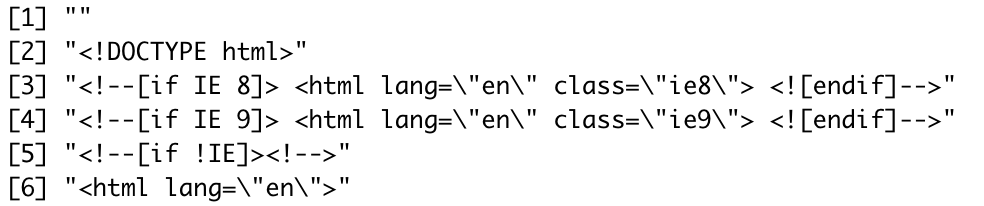
Result of the head(x) function
Snapshot of the content of the file copied into readFromUrlExamplehtml

The sample source code can be retrieved at 

https://github.com/masteramuk/LearnR-Coursera/blob/master/sample-ReadFromUrl.R

Share:

Friday, May 29, 2020

Solving Committing Issue between R Studio and Github


Solving Committing Issue between R Studio and Github

In the normal development process, you will create a repo (the repo in this article is located at Github), followed by the cloning process or download as full directory into your localhost. It is much easier and straightforward. There won’t be any issues especially if your scrum master or release manager is a well trained person in handling branching, merging, and releasing code using git.


However, in most cases, especially for a full-stack developer who did everything on its own, you may encounter an issue if:

  1. You created a project in your localhost first using R Studio and set Git as your SVN through your project setting
  2. Then you created the repo at the GitHub
  3. Finally, upon ready, you run command to sync with your GitHub

The following is the command that you use/execute and the result of running the command:

% git remote add origin [your GitHub report url]
% git pull origin master
warning: no common commits
remote: Enumerating objects: 3, done.
remote: Counting objects: 100% (3/3), done.
remote: Compressing objects: 100% (2/2), done.
remote: Total 3 (delta 0), reused 0 (delta 0), pack-reused 0
Unpacking objects: 100% (3/3), done.
From [your GitHub report url]
* branch master -> FETCH_HEAD
* [new branch] master -> origin/master
fatal: refusing to merge unrelated histories

and you see the last sentence .. ERROR


Then, based on google, you followed with the following command

% git push -u origin master

and you get the following response (or similar)

To [your GitHub report url]
! [rejected] master -> master (non-fast-forward)
error: failed to push some refs to ‘
[your GitHub report url]'
hint: Updates were rejected because the tip of your current branch is behind
hint: its remote counterpart. Integrate the remote changes (e.g.
hint: ‘git pull …’) before pushing again.
hint: See the ‘Note about fast-forwards’ in ‘git push — help’ for details.

Next, you try to pull again to get the latest branch based on the previous error by running the command to pull again

% git pull origin master

And the result is still not promising 
From [your GitHub report url]
* branch master -> FETCH_HEAD
fatal: refusing to merge unrelated histories

What are you missing or wrongly done? I won’t be able to tell you the missing or wrong steps, but I’m sharing your step to overcoming the problem.


STEPS

  1. Go to you localhost directory where you created the project
  2. In that directory, you should find a file name .gitignore & folder .git
  3. Delete both by running rm -fr (if you are using windows, the command might be different)
  4. Next, init your project file again by running the command git init. You shall see the following message appear after executing the command — Initialized empty Git repository in [your project path]
  5. Followed by adding the remote repo by running the command git remote add origin [your GitHub repo url]
  6. The followed by git add . (make sure there is ‘.’ at the end of the command). It tells the git to add all directories in the remote repo to your local.
  7. Followed by git pull origin master. If succeed, you shall be able to see the following result:
    remote: Enumerating objects: 3, done.
    remote: Counting objects: 100% (3/3), done.
    remote: Compressing objects: 100% (2/2), done.
    remote: Total 3 (delta 0), reused 0 (delta 0), pack-reused 0
    Unpacking objects: 100% (3/3), done.
    From [your GitHub repo url]
    * branch master -> FETCH_HEAD
    * [new branch] master -> origin/master
  8. Finally, run git push -u origin master to verify again. You shall see the following result to indicate it is successfully integrated between your local repo and your Github repo and R Studio shall be able to interact perfectly with GitHub.
    Branch ‘master’ set up to track remote branch ‘master’ from ‘origin’. Everything up-to-date

Once you have done all the steps, go ahead to your R Studio and perform Stage -> Commit -> Commit Message -> Push to complete the process. Refresh your Github page and you shall see all of your local files at your GitHub repo.

If you find this useful, you can buy me a coffee :) @ https://www.buymeacoffee.com/masteramuk

Share:

Monday, May 25, 2020

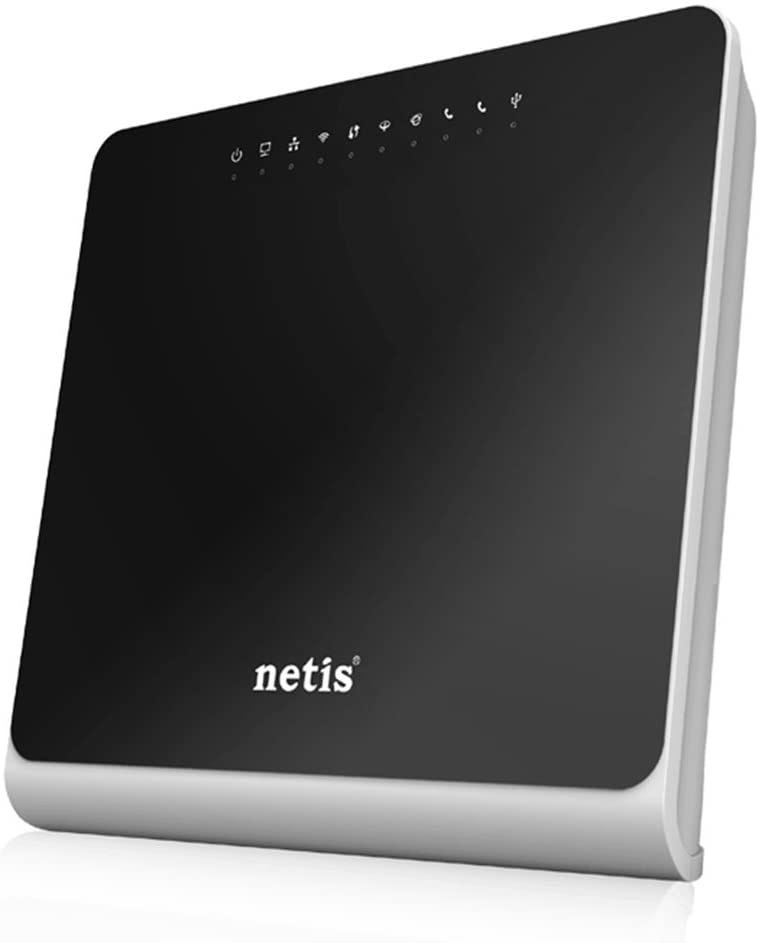
Solving Internet Router Problem - TM Unifi NETIS DL4480V

TM Unifi NETIS DL4480V Connectivity Problem

After a while, the NETIS DL4480V router provided by TM upon subscribed to TM Streamyx (or TM Unifi lite) will fail to work properly. Your internet connection may be up and down or worst the router itself will frequently disconnected or restart.

Before that happen, in case you need to reset your router, Please DO NOT go to https://easyfix.unifi.com.my/ or https://easyfix.unifi.com.my/reconfigure_wifi_netis

It is useless (worth to try but it won’t be helpful enough).

You can even call their call-center line at 100 and the best guidance you can get is just to confirm your username and password again and resetting your port. It may work or may not work at all. If it works, you still need to tweak on your own (or worst, wait for their technician to drop by, which may take 1, 2, 3 days or even week after you file your report unless you keep bugging them via SOCMED or phone call if you are in dire need of internet connectivity).

Why I stated that you need to tweak on your own. This is because the technician will only install and use the basic setting to set up your router. They won’t do extra miles to ensure that your internet connection is superb. There are a few things you can do to improve your internet connection. Before that, let us do simple tweaking and have a stable connection first.

There are few links here that might help you in tweaking it (IF it still able to connect to TM Switches PERMANENTLY, but failed to connect to any website).

1. https://www.youtube.com/watch?v=CX0PXujZbAs
2. https://www.youtube.com/watch?v=Awf4RK5z-V4&app=desktop
3. http://hotspotsystem.com.my/index.php?route=pavblog/blog&blog_id=209

Well, that shall do it. If the problem persists, just get them to send the technician ASAP and request to change the router. This might be the core problem of failure like mines. That’s it… or you can buy your own router and make sure it is VDSL2 (for unifi/fiber) ya.

The final step is to tweak a little bit more to have a better connection. You may not be needed if you think yours is working fine.

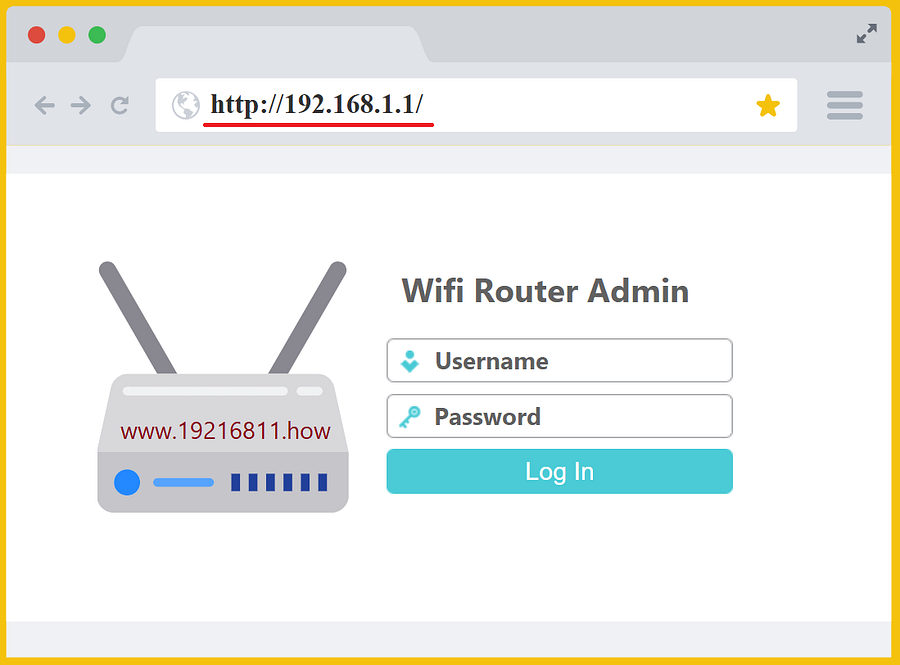
1. Disable some of the security features. Please, do this IF you are using it for your OWN purpose and not to setup for openly accessible wifi. You may disable firewall, IDS, IPS setting or tweak it to your own need. To do this, you need to login to your router page at 192.168.1.1 and go to security section (normally at Advance tab)
2. Change the DNS (from automatic to manual) and follow the following few links

Adios

TM Unifi NETIS DL4480V Connectivity Problem

Share:

Sunday, April 26, 2020

Improving your Telegram Security


Telegram’s user continues to increase and recently it reaches 400 million user per month
Since its birth, there are many features added plus friendly API allowing various innovative ideas add-in to its base. 


But, having lots of features may also result in lots of possibilities for hacking. One of the many features that may be wrongly used is the Automatic Media Download. 

As noob @ beginner, many do not realize it until their phone or PC slow due to disk space has shrunk as telegram keeps on automatically download all files. 

The most scarier is that the auto-play anything including GIF, video, and audio. All this can be used by hackers to insert a code and inject it upon executed/run by telegram.

However, luckily telegram allow us to modify the setting. Here are the steps to change it:
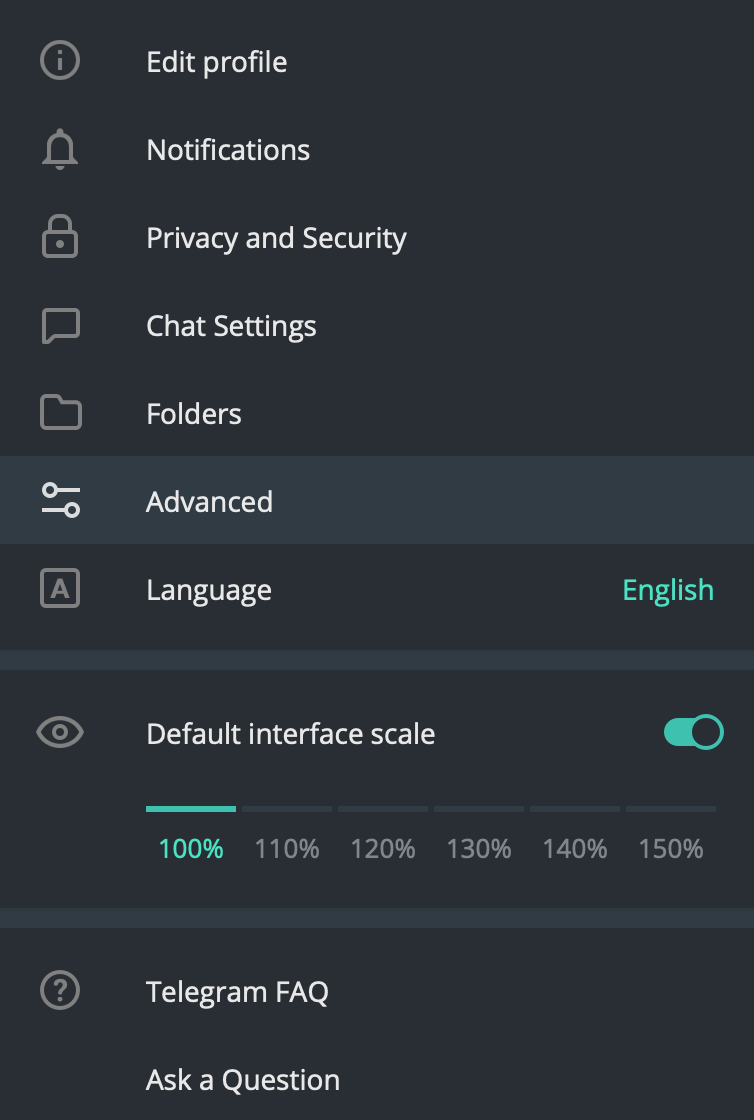
  1. Go to your telegram setting and choose Advance
Telegram setting window
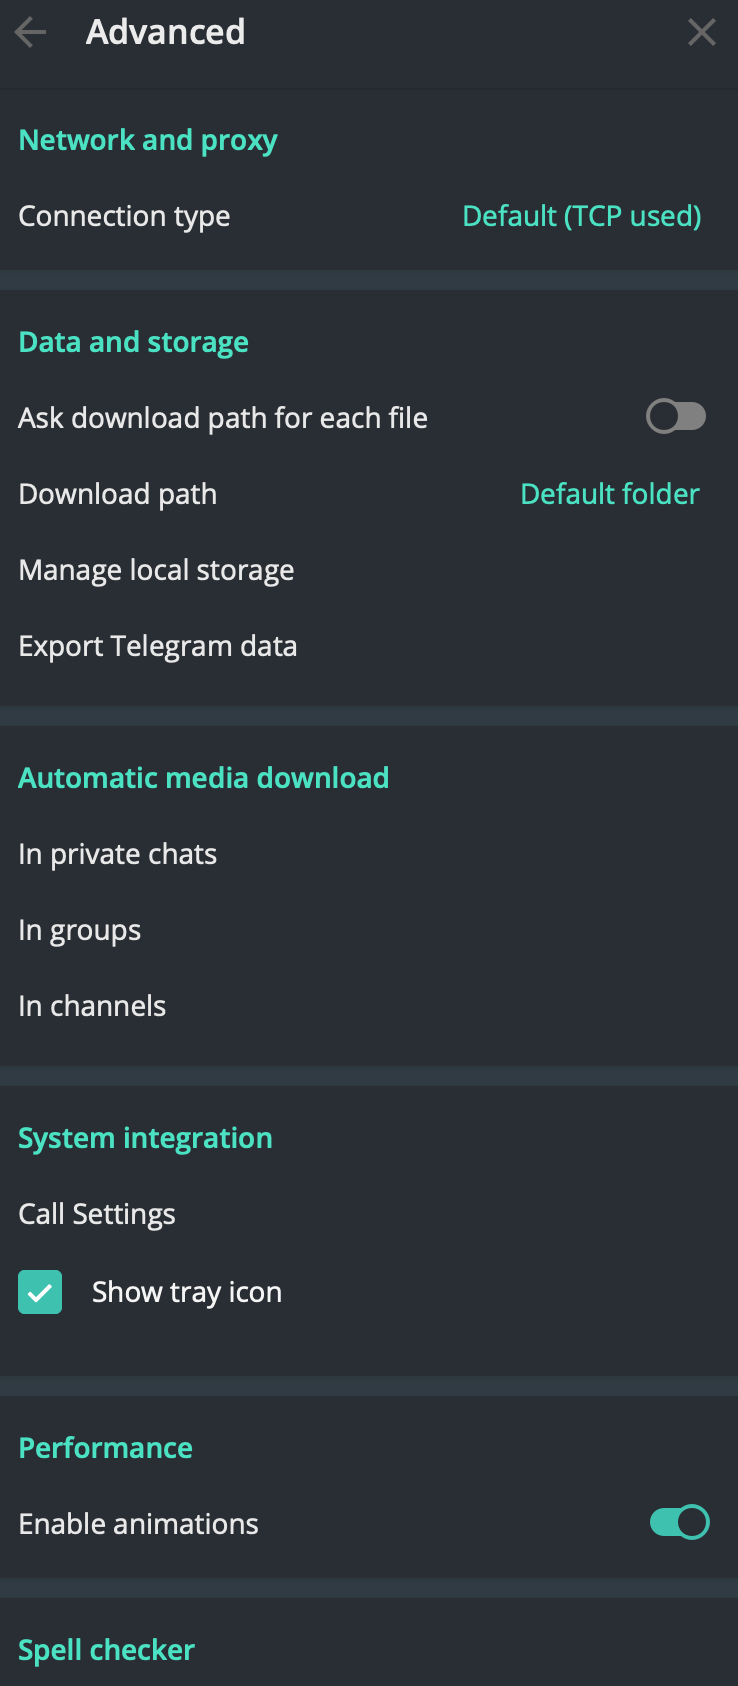
2. At the Advance screen, go to Automatic media download section
In the Advance setting
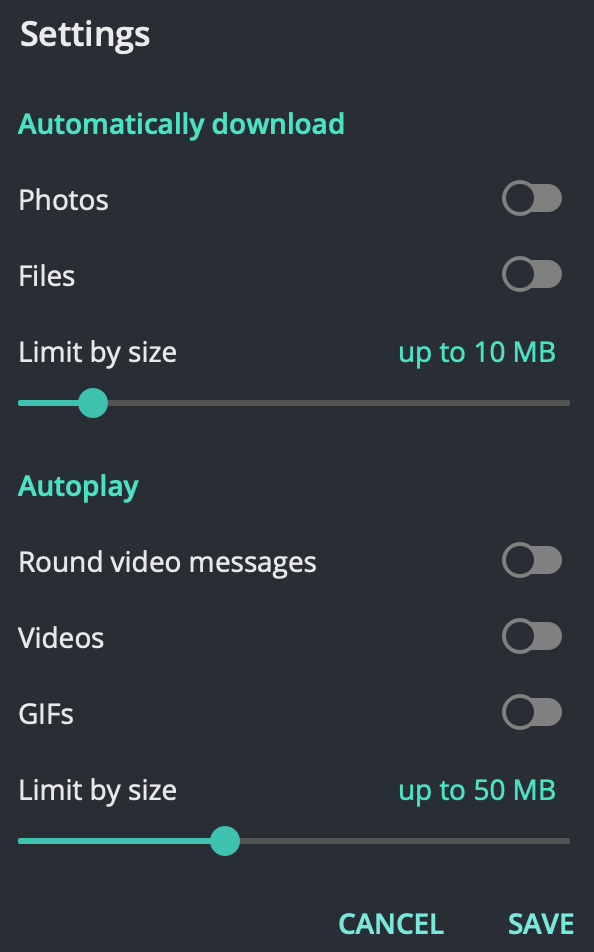
3. Click In private chats
In automatic media download setting
4. In the setting, click all the slide-tick to disable it (or you can choose whichever you want to enable or disable). You can even reduce the size to increase the protection rate.

5. Continue the process for all settings within the Automatic media download section.


That’s all.. you are ready to go and you shall be safe.
Share:

Saturday, April 18, 2020

Tableau Public - Apple Mobility Data and Dark Mode

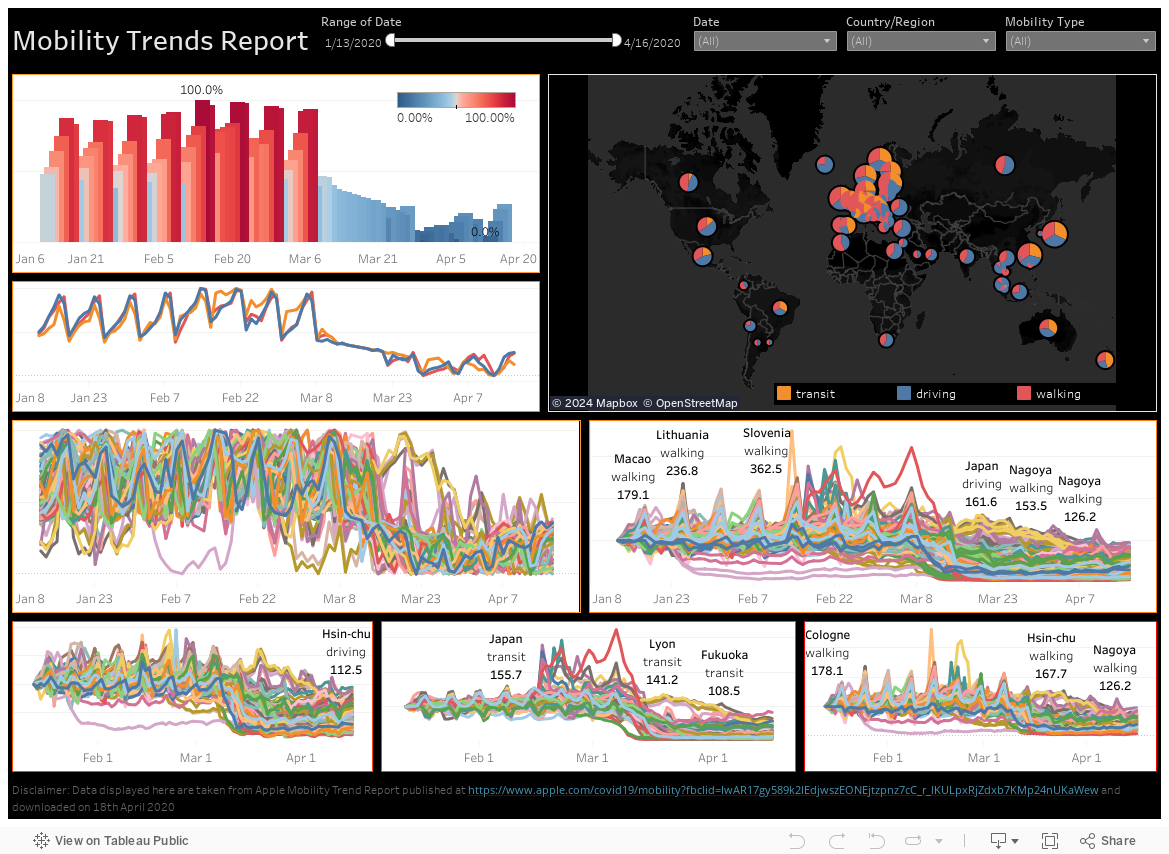
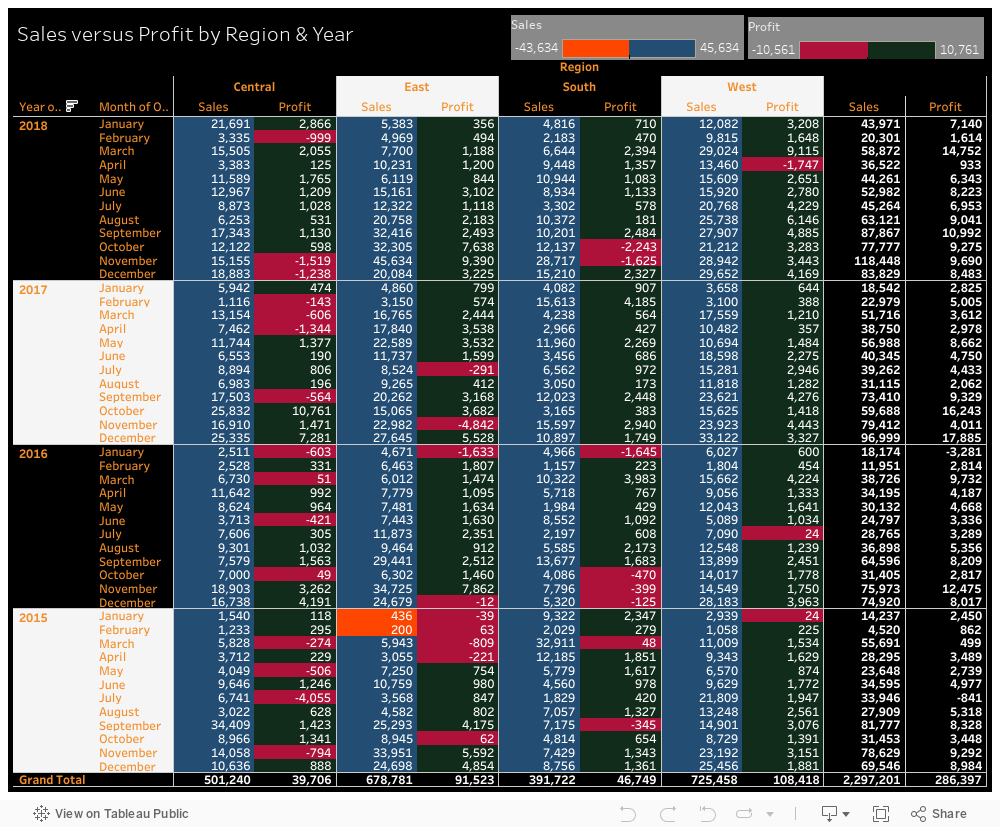
I've been working on 2 visualizations. 1 is based on Apply Mobility Data and the other is based on edited Sample Superstore.

Check it out here.

Mobility Data based on Apple's mobility data.


Grid on Dark Mode based on Tableau Sample Superstore (edited version)

All visual is available at https://public.tableau.com/profile/nurul.haszeli.ahmad#!/

All dataset is available at data.world @ https://data.world/haszeliahmad/data-analysis
Share:

Saturday, April 11, 2020

Parameter in Tableau - Using available Dimension with additional 'All' for all data

I am writing (and still writing as of this article) a manual to assist me in teaching Tableau. One of the sections is Parameter. There are many examples and guidance provided by Tableau.

You may read/view the following articles/videos for the guide on parameter.
  1. https://interworks.com/blog/interworks/2012/03/26/how-to-create-and-use-parameters-in-tableau
  2. https://help.tableau.com/current/pro/desktop/en-us/parameters_create.htm
  3. https://help.tableau.com/current/pro/desktop/en-us/changing-views-using-parameters.htm
  4. https://www.youtube.com/watch?v=CrfEJ24FWpQ
  5. https://www.youtube.com/watch?v=rJsaezoTVAE
  6. https://www.youtube.com/watch?v=opfVV1maNVw

The only problem I faced was to have an 'All' data if the user did not select any or wishes to see all data. None of them help. I tried using Action and Filters, yet it only shows based on selection and all show nothing.

That is until I found this solution.

IFNULL([FilterField],’Null’) = IF [Paramter] != ‘All’ THEN [Parameter] ELSE IFNULL([FilterField],’Null’) END
In a more readable, it will be like this

IFNULL([FilterField],’Null’) = (
     IF [Parameter] != ‘All’ THEN 
          [Parameter] 
     ELSE 
          IFNULL([FilterField],’Null’) 
     END
)

Step to:
  1. Create your parameter - In this case, you use any Dimension as the Parameter by choosing a List and choose the list by changing the Fixed section and click on Add Values From.
  2. Don't forget to add 'All' as one additional list
  3. Drag the Dimension that you used as the parameter from the Dimensions Card into Filters Card.
  4. In the Filter option, choose Condition and choose by Formula, and insert the above solution into the formula. 
  5. Don't forget to change the [FilterField] to the Dimension used for the filter and the [Parameter] to your created parameter. 
  6. Do ensure that 'All' is the same as your definition in the parameter (the character case and spelling is equal)
  7. And that shall do it. You are ready to go.


There are also an alternative solution to this and posted here: http://www.vizwiz.com/2012/09/tableau-tip-adding-all-filter-option-to.html
Share:

About Me

Somewhere, Selangor, Malaysia
An IT by profession, a beginner in photography

Labels

Blog Archive

Blogger templates