My experience on my daily works... helping others ease each other

Tuesday, February 25, 2020

List of User-Agent for browser compatibility

There are occasions when you would access some website, it does not support your browser. Either Chrome, Edge, Firefox, etc. This mostly applied to old systems or system that is using old technology, framework or library.
What you can do? You already upgrade your browser and you have installed many browsers and it still does not work properly.
The only solution is to change your user agent setting of the browser.
For instance 
  1. in Safari: On the menu bar, go to Develop -> User Agent and select from the list. If there are none, choose Other and enter the user agent setting.
  2. in chrome: refer https://winaero.com/blog/change-user-agent-chrome/
  3. in firefox: refer https://winaero.com/blog/change-user-agent-firefox/
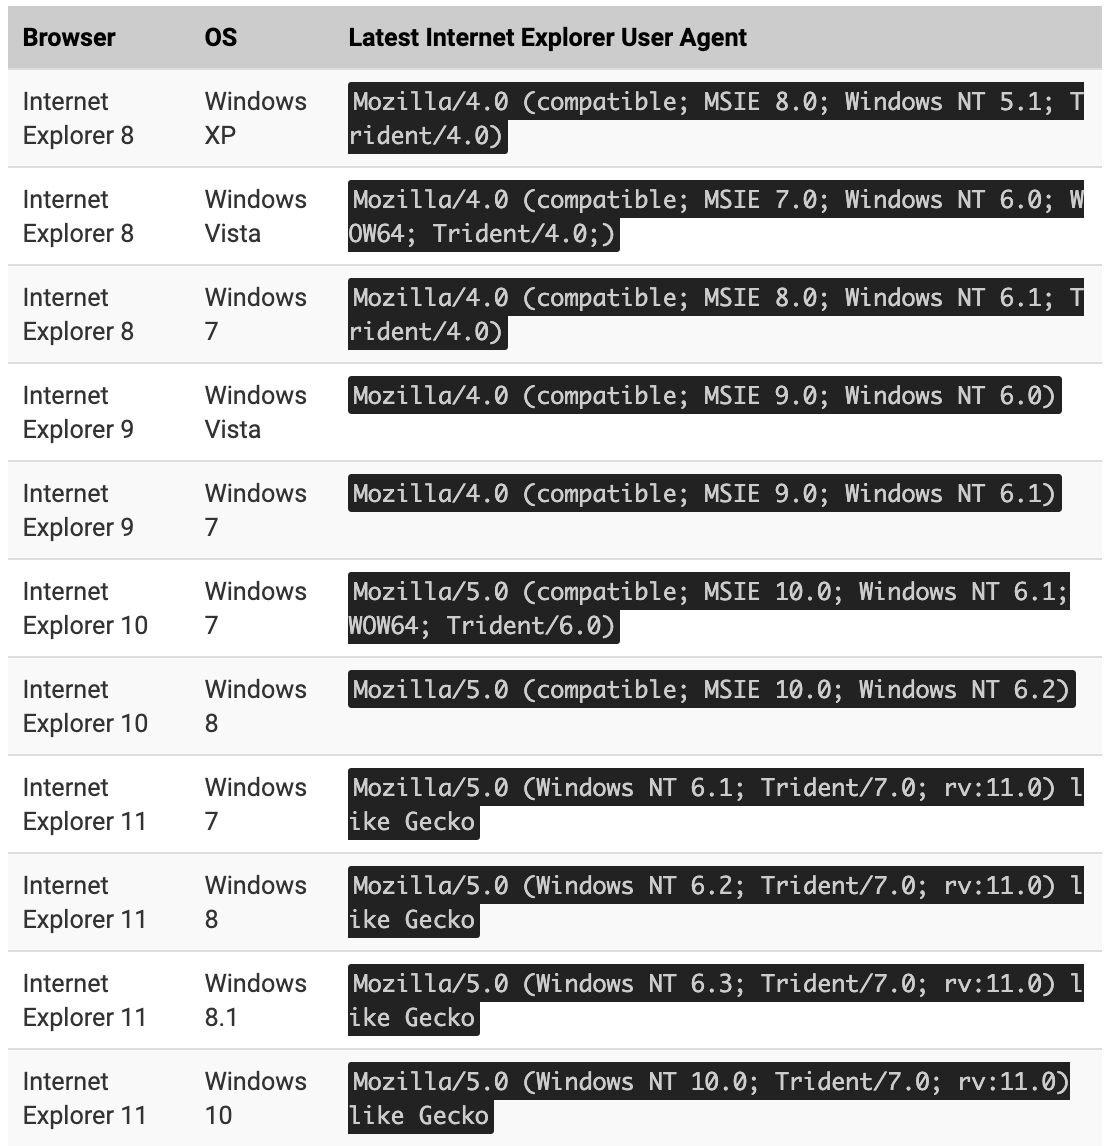
Here are the list of user-agent code you can use
From https://www.whatismybrowser.com/guides/the-latest-user-agent/internet-explorer
Share:

Running Pentaho Data Integration in Mac OS Catalina version 10.15 and above


If you haven’t download the application, you may access here https://community.hitachivantara.com/s/article/downloads

Running Pentaho Data Integration @ Spoon in Windows or Linux should be straight-forward. Either click on spoon.bat or spoon.sh or the Data Integration app icon.
Running Data Integration from the install folder
However, for Mac OS, especially with the latest version Catalina which only allowed certified and trusted 64-bit application to run, running Data Integration will be troublesome despite the security for the app was disabled and allowed for the application to run. 


Some of the guidance on enable security and allow the untrusted app to run are as follow:
  1. https://edpflager.com/?p=3571
  2. https://andres.jaimes.net/1388/running-pentaho-spoon-on-mac-osx/
I have tried both and after enabling the apps, click on the Data Integration icon still does not work and the application still did not run. 

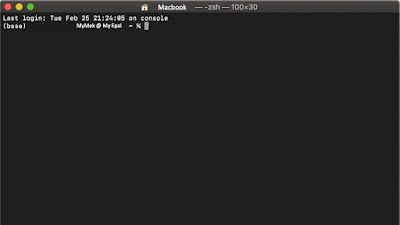
Lastly, I had to try to run it through the terminal. For OSX Catalina and above, instead of normal bash, Apple brings in zsh and the behavior is totally different. Plus, if you are a developer and install many Java JDK, running the Pentaho Data Integration will not be as running the normal command. Here is the step to run on the terminal and it works for all OSX.

1. Open up your terminal


2. Navigate to your install path (where you install or unzip the data integration file)


3. Run ./spoon.sh (for bash or old scripting, running spoon.sh shall work without ‘./’)

4. If you run into an error such as JDK or java runtime error like below, do not panic. This maybe your current java JDK is set to be higher than supported by the application.

(base) MyMek @ MyEpal data-integration % ./spoon.sh
OpenJDK 64-Bit Server VM warning: Ignoring option MaxPermSize; support was removed in 8.0
-Djava.endorsed.dirs=/Users/masteramuk/Documents/Apps/data-integration/system/karaf/lib/endorsed is not supported. Endorsed standards and standalone APIs
in modular form will be supported via the concept of upgradeable modules.
Error: Could not create the Java Virtual Machine.
Error: A fatal exception has occurred. Program will exit.

5. First, check your JDK version. Open a new terminal as the command need to be executed from the base (unless you set the JDK in your profile which may cause problem to run multiple JDK later). Run command java -version. You shall have similar to below. In my laptop, the current JDK version is set to JDK version 10.

(base) MyMek @ MyEpal data-integration % java -version
openjdk version "10.0.2" 2018-07-17
OpenJDK Runtime Environment AdoptOpenJDK (build 10.0.2+13)
OpenJDK 64-Bit Server VM AdoptOpenJDK (build 10.0.2+13, mixed mode)

6. Make sure you have multiple java JDK installed if you need to use the existing JDK version for your ‘other’ development. Refer https://www.devdungeon.com/content/install-multiple-jdk-windows-java-development to install multiple JDK. Refer here https://www.jenv.be/ to install jenv command tool.

7. For my laptop, I have a few versions of JDK and using jenv, I can set the selected JDK for global or local (only applied to the folder where we run jenv local command). Run jenv version to check on current JDK and jenv versions to list all JDK install. 

(base) MyMek @ MyEpal data-integration % jenv versions
  system
  1.8
  1.8.0.232
* 10.0 (set by /Users/masteramuk/Documents/Apps/data-integration/.java-version)
  10.0.2
  13.0
  13.0.1
  9
  openjdk64-1.8.0.232
  openjdk64-10.0.2
  openjdk64-13.0.1
  openjdk64-9

As of this manual written, Pentaho Data Integration @ Spoon supports up to JDK 1.8.

8. Use jenv to change the jdk to 1.9. Run command jenv local [JDK number]. In this example, I execute jenv local 1.8.0.232.
9. Finally, run again ./spoon.sh. The application shall run.

Running


Opening the application

The main screen

Share:

Monday, January 13, 2020

Disruptive UI/UX - The new interactive design of a website

The faces of a website have evolved drastically from normal static one page to multiple page interactive and so on. With Big Data and ML, comes chatbot and more interactive website which more customer engaging concept.

It no time, we will definitely view a website through the Augmented Reality concept. Just read the name on a billboard, and then you will get to see the whole company profile in AR mode. Well, while waiting for this to happen, let us take a look at few revolutionize user engaging designs of a website.

As shared by Bruno Simon at https://bruno-simon.com/


Whom also the master of behind many 'abnormal' website like Orano


and Prior Holding


Go ahead browse the website and you will feel different.


Share:

Codility - PermCheck (Check whether array A is a permutation)


This is the second lesson in Codility. Given an array of integer N, you need to find if the given array is a permutation array or perfect array in sequence (if all numbers are sorted accordingly). The full explanation of the lesson is here.

It does not take me long compared to the previous lesson. I scored 100% on the first trial and here is the explanation of my code.

Since it already stated that the array starts from a positive number, I just set the expected int is 1 and missing to 0
int expectedInt = 1;
int missingInt = 0;
Then, the array is sorted accordingly. I’m using java.util.Arrays library
 Arrays.sort(A);
To find the missing int, just loop the sorted array and find the first occurrence of the missing int.
for (int x : A){ //loop to find the missing int
     if (x == expectedInt){
          expectedInt++;
     } else {
         missingInt = expectedInt;
     }
 }

This code is not perfected yet as it will continue to search despite it found the missing int. I should further improve it later. However, for codility purposes, it stops here. You can further enhance the code by implementing the break clause once found the first missing int.
The code
And here is the result. Ya, it shows 2 minutes; that is because I test it again to snapshot the result :). In actual, for a few trials, it took me around 2 hours to perfect it and scored 100%
Result

You can download the full code at
  1. Bitbucket — git clone https://masteramuk@bitbucket.org/fullstacksdev/codility-permcheck.git
  2. Github — git clone https://github.com/masteramuk/codility-lessoncode.git


Share:

Codility - FrogRiverOne (Find the earliest time when a frog can jump to the other side of a river)

This is the fourth lesson in Codility. You need to find the fastest (earliest) time possible for a frog to start jumping towards the other side of the river. You will be given an array that reflecting the position of jumping/landing point for the frog. 

The frog will start to jump when all landing point is in the right position. Two input is given; X as the final jumping position and Y array of integer. For each element in the array, every index is considered as seconds. You need to arrange the number in the array and trigger when all are in sequence with X as the last element.


It took me another 1 full day and many try-n-error to get it perfect 100%

In the beginning, I’m using 2 Array of Integer as shown below. There are few test cases that failed because the time taken to process is more than the limit given.
100% accuracy but the overall score is 18%
With an improvement in the code, I managed to improve the overall score to 54%. I managed to reduce some of the performance issues.
100% accuracy but overall score is 54%
It looks like Array.copyOf and Arrays.stream do take a longer time to process.

Another improvement has lessened the length of the code and improve the overall score to 63%
63% overall score
The code above simply set the C array to value one of the position indexes of A. Here are the list of test that it fails
▶medium_range
 arithmetic sequences, X = 5,000✘TIMEOUT ERROR
 running time: 0.112 sec., time limit: 0.100 sec.
 1.0.112 sTIMEOUT ERROR, running time: 0.112 sec., time limit: 0.100 sec.
 ▶large_random
 10 and 100 random permutation, X = ~10,000✘TIMEOUT ERROR
 running time: 1.128 sec., time limit: 0.880 sec.
 1.1.128 sTIMEOUT ERROR, running time: 1.128 sec., time limit: 0.880 sec.
 2.0.200 sOK
 ▶large_permutation
 permutation tests✘TIMEOUT ERROR
 running time: 1.716 sec., time limit: 0.880 sec.
 1.1.716 sTIMEOUT ERROR, running time: 1.716 sec., time limit: 0.880 sec.
 2.6.000 sTIMEOUT ERROR, Killed. Hard limit reached: 6.000 sec.
 ▶large_range
 arithmetic sequences, X = 30,000✘TIMEOUT ERROR
 Killed. Hard limit reached: 6.000 sec.
 1.6.000 sTIMEOUT ERROR, Killed. Hard limit reached: 6.000 sec.
I changed my strategy. Instead of using a normal Array of integer, I implement List & ArrayList.

Bad improvement - 54% overall
Instead of getting better, it is getting worse. I google on it and found that List do have performance issues and found few suggestions on it. Either use Hashmap, HashSet, TreeSet or GapList. 


I do improve the process on my laptop and surprisingly, it was way faster than List or ArrayList. Unfortunately, Codility does not support the library. Hence, I need to look for another alternative.

Based on the performance comparison between Hashmap, HashSet, and TreeSet, HashSet seems promising. And so it did. My final code is using HashSet and finally, the result shown is 100%. Here is part of the code:
1. Definition
HashSet list= new HashSet();

2. Used
           for(int idx = 0; idx < A.length; idx++){
         if ( !list.contains(A[idx]) ){
            list.add(A[idx]);
         }
         if ( list.size() == X ){
            return idx;
         }
      }

I also found a few solutions which score 100%
    This solution was shared by someone and it claims score 100/100
    public int solution(int X, int[] A) {
        int[] B = A.Distinct().ToArray();
        return (B.Length != X) ? -1 : Array.IndexOf(A, B[B.Length - 1]);
    }
    
    This solution was shared too and score 100/100 for correctness, task, and performance
    public int solution(int X, int[] A) {
        HashSet unique= new HashSet();
        for (int i = 1; i<= X; i++){
            unique.add(i);
        }
        for(int j = 0; j< A.length; j++){
            if(unique.contains(A[j])){
                unique.remove(A[j]);
                   if(unique.isEmpty()){
                         return j;
                    }
            }
        }
        return -1;
    }


Full source code is accessible at
  1. Bitbucket — git clone https://masteramuk@bitbucket.org/fullstacksdev/codility-frogriverone.git
  2. Github — git clone https://github.com/masteramuk/codility-lessoncode.git


Share:

Sunday, January 12, 2020

Codility - TapeEquilibirium (Finding the lowest difference in an array)


Given an array of int (ranging from -ve to +ve value) with the minimum number of an element is 2 and the maximum element is 100,000, you need to find the lowest difference between two sets of value (of the total sum of the array).

The actual description can be seen at Codility website (https://app.codility.com/programmers/lessons/3-time_complexity/tape_equilibrium/)

It took me 1 full day to resolve it despite the time given was only 120 minutes. On the first trial, I got 88% correct. It resolves all but two out of all test was considered as a failure due to time taken was more than expected. Next few trials, I score between 66% and 84%. The only issue was the double element array and small element array.
After a while, I figure out. The line below
int totalSum = Arrays.stream(A).sum();
is causing the time taken more than expected. Although it passed, it was 0.020 seconds more than the limit.

After a few modifications, wallawei, finally, I achieved 100%.

Snapshot of the code

Result

Full code is accessible at
  1. Bitbucket — git clone https://masteramuk@bitbucket.org/fullstacksdev/codility-tapeequilibrium.git
  2. Github — git clone https://github.com/masteramuk/codility-lessoncode.git


Share:

Saturday, January 11, 2020

Codility - PermMissingElem (Find the missing element in a given permutation)

This is a lesson in codility for the Time Complexity algorithm. Given an array of integer, you need to find the lowest missing integer.

I managed to score 100% for it.

Here is the snapshot of the code:
Based on the length, for all value in Array A, start the search and compare the initial value; that is 1 (expectedInt). If the value exists, the expectedInt is added 1 value.
                 if( A.length > 0 ){
           for (int x : A){
             //if found a value based on expected value 
             if (x == expectedInt){ 
                expectedInt++;
             } else { //if found a mising value 
                missingInt = expectedInt;
             }
           }
         }
If the Array is empty, we will just set the missingInt to 1.
        if (A.length == 0) {
          missingInt = 1;
     }
If no missing int found, then we just add additional 1 to the last value found
       if (missingInt == 0){
           missingInt = A[A.length — 1] + 1;
       }

The complete code is shown below
Codility - PermMissingElem sample code
My result is shown below
Result


You can download the code from here:

  1. Bitbucket - git clone https://masteramuk@bitbucket.org/fullstacksdev/codility-permmissingelem.git
  2. Github - git clone https://github.com/masteramuk/codility-lessoncode.git


Share:

Codility - FrogJmp (Count minimal number of jumps from position X to Y)

Codility - FrogJmp

Count the minimal number of jumps from position X to Y

FrogJmp is the third lesson number 1 out of three in the list for Time Complexity algorithm. Basically, it is an algorithm to count the number of the jump from one X location to Y location when the number of the step taken is given as Z for each single jump

public int solution(int X, int Y, int D){
        int a = 0;
        Y = Y - X; //setting the initial value test

        if (Y >= 1){ //evaluating the Y value
            a = Y/D; //setting the initial return value
            if (Y % D > 0){ //evaluating the possible number of jump to add additional value
                a++;
            }
        }
        if ( a == 0 && (Y%D==0) && Y > X ){ //final check
            a = 1;
        }
        return a;
    };

Result of the code

Code is downloadable from
Github - https://github.com/masteramuk/codility-lessoncode.git
Share:

Thursday, January 9, 2020

Codility - OddOccurrencesInArray (Find value that occurs in odd number of elements)

Given an array, find a value that has no duplication or unpaired value. I scored 100%

public int solution (int[] A){
        int a = 0;
        //sort the array
        Arrays.sort(A);
       
        int[] sortA = A;
        int x = 0;
        int cnt = 1;
        int[] oddA = new int[]{};
        //int idxOdd = 0;
       
        while ( x < sortA.length ){
            if ( x != 0 ){
                if (a == sortA[x]){
                    cnt++;
                } else {
                    if (cnt % 2 > 0){
                        oddA = Arrays.copyOf(oddA, oddA.length + 1 ); //sortA[ x - 1];
                        oddA[oddA.length - 1] = sortA [x - 1];
                    }
                    a = sortA[x];
                    cnt = 1;
                }
            } else {
                a = sortA[x];
            }
            x++;
        }
        if ( x == sortA.length && cnt == 1) {
            oddA = Arrays.copyOf(oddA, oddA.length + 1 ); //sortA[ x - 1];
            oddA[oddA.length - 1] = sortA[x - 1];
        }
        System.err.println("sortA: " + Arrays.toString(sortA) + System.lineSeparator() + "Result: " + Arrays.toString(oddA));
        return oddA[0];
    };

The code is downloadable from
Share:

Codility - CyclicRotation (Rotate an array to the right by a given number of steps)

This is the second lesson in Codility; that is to rearrange an array to the right based on the number of steps given. It will be two input and I scored 100% for it.

public int[] solution (int[] A, int K){
        int a = 0;
        int[] sortA = A;
        int x = 0;
     
        while (x < K && x < A.length){
            a = sortA[sortA.length - 1];
         
            Arrays.copyOfRange(sortA, 0, sortA.length);
            sortA = Arrays.copyOf(sortA, sortA.length);
            System.arraycopy(sortA, 0, sortA, 1, sortA.length - 1);
            sortA[0] = a;
         
            System.err.println( x + " : " + Arrays.toString(sortA) + " - " + a);
         
            x++;
        }
        return sortA;
    };


  100% CyclicRotation

You can get the code at
Bitbucket - git clone https://masteramuk@bitbucket.org/fullstacksdev/codility-cyclicrotation.git
Github - git clone https://github.com/masteramuk/codility-lessoncode.git

Share:

Codility - Find longest sequence of zeros in binary representation of an integer.

I'm taking the coding test at Codility for a job offered by a Japanese company (of which I did not get it). For practice, I tried all and this are the code (in Java) for binary gap

public int solution (int N){
//Convert the value to binary and split the value between number 1
        String s2[] = Integer.toBinaryString(N).substring(0, Integer.toBinaryString(N).lastIndexOf('1') ).split("1");
        int x = 0;
        int a = 0;
        
//find and count the longest zeros
        while(x < s2.length){
            a = a > s2[x].length() ? a : s2[x].length();
            x++;
        }
        
        System.out.println("Number: " + N + System.lineSeparator() + "Binary: " + Integer.toBinaryString(N) 
                + System.lineSeparator() + "Zero: " + a);
        return a;
    };

It score 100% for codility test.

You can download the code here
Bitbucket - git clone https://masteramuk@bitbucket.org/fullstacksdev/codility-binarygap.git
Github - git clone https://github.com/masteramuk/codility-lessoncode.git
Share:

Wednesday, January 1, 2020

Tableau For Beginner

I'll be publishing an ebook on Visualizing using Tableau. To those interested, please PM ya. Here is the front page.


Share:

Sunday, December 22, 2019

Ionic 4 + React + Capacitor: Publishing Your Apps

Since I don't have Apple Store Developer Account yet, I can only publish on Android, of which at Google Play Store. Head up if you are ready.

Before you start. Here is my development tools/environment.
  1. VS Code 

  2. Version: 1.41.0
    Commit: 9579eda04fdb3a9bba2750f15193e5fafe16b959
    Date: 2019-12-11T17:58:38.338Z
    Electron: 6.1.5
    Chrome: 76.0.3809.146
    Node.js: 12.4.0
    V8: 7.6.303.31-electron.0
    OS: Darwin x64 19.2.0


  3. OSX Catalina with zsh (I am not using Bash)

  4. Samsung A50 running Android

Steps to publish your first Apps on Google Play.

1. Check your installation
           Command to check your NPM version
       % npm -v
       6.13.4
           Command to check your ionic version
       % ionic -v

       5.4.13

2. Test your apps on Android devices by running the following command on your command prompt
    ionic serve --devapp

   > ionic integrations enable cordova
   [ERROR] Ionic doesn't support using Cordova with @ionic/react projects.
        
        We encourage you to try ⚡️ Capacitor ⚡️ (https://ion.link/capacitor)

If you come across the above error, no worries. This is because your app is Ionic + React and Cordova does not support this. You need to add capacitor to it. If you already configure it with capacitor before, you don't need to run the command.

Run the following command.
      % ionic integrations enable capacitor
Once completed, you will see the following
     ðŸŽ‰   Your Capacitor project is ready to go!  🎉


    Add platforms using "npx cap add":

    npx cap add android
    npx cap add ios
    npx cap add electron

    Follow the Developer Workflow guide to get building:
    https://capacitor.ionicframework.com/docs/basics/workflow
     

    [OK] Integration capacitor added!

Next, initialize your apps to use the capacitor by running command npx cap init [appname] [appid]. The appname and appid are available in file capacitor.config.json.

Once done, run ionic build command. You shall see similar to following
> react-scripts build
Creating an optimized production build...
Compiled successfully.


File sizes after gzip:
...

354 B     build/static/js/5.c9486a88.chunk.js

The project was built assuming it is hosted at the server root.
You can control this with the homepage field in your package.json.
For example, add this to build it for GitHub Pages:

  "homepage" : "http://myname.github.io/myapp",

The build folder is ready to be deployed.
You may serve it with a static server:

  npm install -g serve ##this command is to install static server
  serve -s build       ##this command is to run the static server

Find out more about deployment here:   

Give it a try by running the last two command shown above. I did and the following appeared. Give it a try and use any other computer to browse your apps.

   ┌───────────────────────────────────────────────────┐
   │                                                   │
   │   Serving!                                        │
   │                                                   │
   │   - Local:            http://localhost:5000       │
   │   - On Your Network:  http://192.168.1.123:5000   │
   │                                                   │
   │   Copied local address to clipboard!              │
   │                                                   │

   └───────────────────────────────────────────────────┘

Voila!! You are halfway go from releasing your apps. BUT damn, you get few more errors when you try running command npx cap add android
   [error] The web directory ([some folder of your apps]) must contain a "index.html".

    It will be the entry point for the web portion of the Capacitor app.

What is next? If you google it, you will only be directed to https://github.com/ionic-team/capacitor/issues/116 or few which won't resolve your problem. Just go to your project folder, find where index.html is located. For mines, it is located in the folder public.


So, change your capacitor.config.json to point the webDir to the folder that holds the index.html. In my case, it will look like below
"npmClient": "npm",
"webDir": "public",

Finally, run ionic build and followed by npx cap add android.
Once done, you will see the following message.
✔ Installing android dependencies in 18.77s
✔ Adding native android project in: /YourProjectPath/android in 77.66ms
✔ Syncing Gradle in 107.10s
✔ add in 125.95s
✔ Copying web assets from public to android/app/src/main/assets/public in 7.90ms
✔ Copying native bridge in 1.21ms
✔ Copying capacitor.config.json in 4.62ms
✔ copy in 24.10ms
✔ Updating Android plugins in 3.01ms
  Found 0 Capacitor plugins for android:

✔ update android in 14.69ms

Now you can run npx cap open android to launch Android Studio

So go ahead run the command npx cap open android 
The command will open your android studio, update your Gradle and build your apps. It shall tell you where your APK is released.


Once done, observed on Gradle Sync Issues. Any Red or Orange, please do resolve it first.
Test your apps by running it.

NOTE: If you still face a problem; for instance, you have blank screen, Follow the following steps:
Ionic 4 + React + Capacitor — The right way of building mobile apps with these three https://link.medium.com/uHL1APKDx2 or http://malaysiandeveloper.blogspot.com/2019/12/ionic-4-react-capacitor-right-way-of.html

3. Test your apps by running it on emulater.
4. Before you publish your apps, create your splash screen. You can follow the steps shown here. I do it manually; that is by changing all icons in all folders located at android/app/source/main/res using Adobe Photoshop. Then I added the following in my capacitor.config.json file
"plugins": {
"SplashScreen": {
"launchShowDuration": 3000,
"launchAutoHide": true,
"backgroundColor": "#000000",
"androidSplashResourceName": "splash",
"androidScaleType": "CENTER_CROP",
"androidSpinnerStyle": "large",
"iosSpinnerStyle": "small",
"spinnerColor": "#ff9900",
"showSpinner": true
}
}

That shall do it.

5.  If you change the config and add new files, just recompile your code (start at step 2 again) and rebuild your APK.

6. Finally, you are ready to publish. If you are using Ionic 4 + React + Capacitor, skip step 7 to 10.

7. Create your key (if you have yet to do so). Follow the following step
(base) % keytool -genkey -v -keystore [yourkey.keystore] -alias [aliasname] -keyalg RSA -keysize 2048 -validity 999999
Enter keystore password:  
Re-enter new password: 
What is your first and last name?
  [Unknown]:  [Your Name]
What is the name of your organizational unit?
  [Unknown]:  [Your Company]
What is the name of your organization?
  [Unknown]:  [Your Company]
What is the name of your City or Locality?
  [Unknown]:  [Your current Local]
What is the name of your State or Province?
  [Unknown]:  [Your State]
What is the two-letter country code for this unit?
  [Unknown]:  MY
Is CN=My Name, OU=MyName, O=MyName, L="Local", ST=State, C=MY correct?
  [no]:  Yes

Generating 2,048 bit RSA key pair and self-signed certificate (SHA256withRSA) with a validity of 999,999 days
for: CN=My Name, OU=MyName, O=MyName, L="Local", ST=State, C=MY

[Storing my-release-key.keystore]

8. Signed your Unsigned APK (or your successful compiled/debug APK). Normally, your APK is located at android/app/..../debug/
- Run the command
jarsigner -verbose -sigalg SHA1withRSA -digestalg SHA1 -keystore my-release-key.keystore /android/app/build/outputs/apk/debug/app-debug.apk [your-alias-name-given-during-key-generation]
Enter Passphrase for keystore: 

 updating: META-INF/MANIFEST.MF
....
Warning: 
The signer's certificate is self-signed.
No -tsa or -tsacert is provided and this jar is not timestamped. Without a timestamp, users may not be able to validate this jar after the signer certificate's expiration date (4757-11-17).

(base) % 

Note: Don't worry about the warning as you are signing using your own certs.
If you face problem of jarsigner error: java.time.DateTimeException: Invalid value for MonthOfYear (valid values 1 - 12): 0
Don't worry, just change your Java Environment/JDK to higher version. For example, I'm using Java 9 during the signing process, I just switch to JDK10 using JEnv. and it works

9. Next, align your APK or in other words, compile for final release using the Zipalign command.

(base) % zipalign -v 4 [your-signed-apk].apk [yourfinalnameapps].apk

please make sure you include the path to your APK and path to zipalign. Zipalign is located in android folder; for instance, mine is located at ~/Library/Android/sdk/build-tools/29.0.2/

10. Once done, you should be able to release it to Google.

11. For Ionic + React + Capacitor, you must perform few edits before you can begin.


12. Then run the command npm run build, followed by npx cap copy android or npx cap sync android.

13. Open your Android Studio and rebuild the projects.

14. Use your Android Studio to perform the following:


** Note: Please create key using Android Studio to ease in publishing the apps

15. Touch down. Open your Google Play Dashboard and start your publishing process.

The full documentation is reachable at https://ionicframework.com/docs/publishing/play-store and https://ionicframework.com/docs/v1/guide/publishing.html and https://support.google.com/googleplay/android-developer/answer/7159011
Share:

About Me

Somewhere, Selangor, Malaysia
An IT by profession, a beginner in photography

Labels

Blog Archive

Blogger templates